Editing drawing objects
Editing drawing objects
This section describes how to perform basic object editing such as move, rotate, position and align in LibreOffice Draw.
Moving objects
To move an object (or a group of objects), place the mouse cursor on top of the object and when the hand icon ![]() appears hold down the left mouse button while dragging the mouse. During movement, a ghost image of the object appears to help with repositioning. To place the object at its new location, release the mouse button.
appears hold down the left mouse button while dragging the mouse. During movement, a ghost image of the object appears to help with repositioning. To place the object at its new location, release the mouse button.

Adjusting object size
To change the size of a selected object, move the mouse cursor to one of the selection handles. The mouse cursor will change shape ![]() to indicate the direction of movement for that selection handle. As you change the size of the object, a ghosted outline of the object appears. When you have reached the desired size of the object, release the mouse button.
to indicate the direction of movement for that selection handle. As you change the size of the object, a ghosted outline of the object appears. When you have reached the desired size of the object, release the mouse button.

If you press the SHIFT key while resizing an object the aspect ratio of the object remains the same.
Rotating and slanting
To rotate an object, select the object, then click two times inside to go to rotation mode. The selection handles will change shape and color. Also a rotation point will appear in the center of the object. As you move the mouse cursor over the handles, the cursor changes shape. The corner handles are for rotating an object and the top, bottom and side handles are to slant an object.
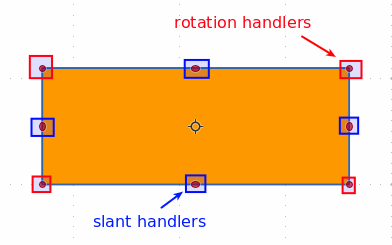
Rotating
Move the mouse cursor to one of the corner handles and it normally changes to an arc with an arrow at each end ![]() . Click and hold the mouse button, then start to move the cursor to rotate the object.
. Click and hold the mouse button, then start to move the cursor to rotate the object.
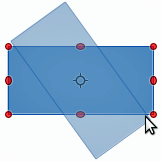
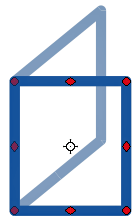
Slanting
To slant an object, use the handles located at the midpoints on the top, bottom and sides of a selected object. The mouse cursor changes shape ![]() when it hovers over one of these midpoint handles.
when it hovers over one of these midpoint handles.
Click and hold the mouse button, then move the cursor to shear the object. A ghost image of the object being slanted appears and the current angle of slant is shown in the status bar.
Positioning objects
In Draw, objects can be accurately and consistently positioned using the Snap to Grid function.
Displaying the grid
To display or to switch off the grid the grid in Draw
- Go to View > Grid and Helplines > Display Grid on the Menu bar. When this option is enabled the icon has a grey color.
- Alternatively click on the Display Grid
 icon on the Standard toolbar.
![]()
Snap to Grid
When Snap to Grid is enabled, all objects are positioned to grid points or snapped to grid. Use this function when you want accurate positioning of shapes like for example in flow charts, technical drawings and floorplans.

Arranging, aligning, and distributing objects
In Draw you can arrange, align, and distribute selected objects in relation to each other:
Arrange
Each object that you place in your document is successively stacked on the preceding object. Arrange the position of an object by moving it either forward or backward in relation to the order of objects using the arrange buttons one the Standard toolbar.
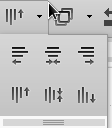
Alignment
Align objects with respect to each other using Left, Centered, or Right for horizontal alignment and Top, Center, or Bottom for vertical alignment. First select two or more objects and click on the alignment button.
The image below shows the result of vertically aligning the tops of three blue squares.

Distribution
If you select three or more objects in Draw, you can also use the Distribution command to distribute the vertical and horizontal spacing evenly between the objects.
- Select three or more objects to be distributed.
- Click the Distribution
 button on the Standard toolbar.
 - Select the horizontal and vertical distribution option and click OK.

Selected objects are distributed evenly along the horizontal or vertical axis. The two outermost objects are used as reference points and do not move when the Distribution command is applied.
The following example shows the result for horizontal distribution of the three blue squares.
