Table layout formatting
Table layout formatting
Formatting a table is, a two-step process:
- formatting of the table layout (the subject of this section) and
- formatting of the table text (the subject of the next section)
Formatting the layout normally involves one or more of the following operations:
- inserting and deleting rows and columns
- merging and splitting individual cells
- adjusting sizes of rows and columns
- adjusting the size of the table and its position on the page,
Insert rows and columns
To insert rows and columns, use the corresponding buttons on the Table toolbar. First place the cursor in a cell and then select one of the following commands.
| insert row above | |
| insert row below | |
| insert column left | |
| insert column right |
Delete table, rows and columns
To delete rows and columns or the whole table, use the corresponding buttons on the Table toolbar. First place the cursor on a row or column column you want to delete, and then select one of the following functions.
|
delete row |
|
| delete column | |
| delete table |
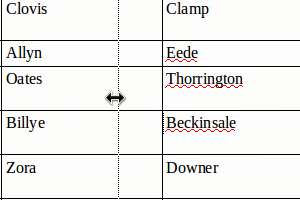
Selections inside a table
You can select a cell, a group of cells, a row, a column or the whole table using the standard mouse click and drag technique.
To quickly select a row or a column place the mouse pointer just outside the row or column and click.
To quickly select a cell click the ![]() button on the Table toolbar.
button on the Table toolbar.
To quickly select all table cells, click the select table button ![]() .
.
Merge and Split
Splitting a table
To split a table in two, click inside the first row of the second table and click the ![]() button from the Table toolbar
button from the Table toolbar

Splitting and merging cells
The split and merge tools allow us to create more complex table layouts.
To split, first select a cell and then click on the split ![]() cell button. In the dialog choose the number of cells to split into and direction. The horizontal direction will divide the cell into rows, while the vertical in columns.
cell button. In the dialog choose the number of cells to split into and direction. The horizontal direction will divide the cell into rows, while the vertical in columns.

To merge, select your cells and click the ![]() merge button.
merge button.
Resizing tables
Resizing row height and column width.
To resize the height of a row or width of a column simply place your mouse over the row or column border and when the resize pointer appears drag the line to the new position.
Optimize table size
The optimize table size tool ![]() help us to automatically change size of columns and rows.
help us to automatically change size of columns and rows.
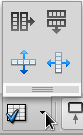
The tool provides the following functions:
Optimize row height or column width
![]()
Resizes the row height or column width to fit the contents in the smallest possible size.
Distribute rows or columns evenly
![]()
Changes sizes in a way that all rows have equal height and all columns have equal width.
Table alignment
To vertically align a table click on Table properties ![]() button to open the Table format window.
button to open the Table format window.

In this window you can set the alignment (left, center, right, automatic). The default alignment is automatic which means that the table occupies the full width of the page. In the window you can also set the distance from the page borders (spacing) of the table.